共計 4128 個字符,預計需要花費 11 分鐘才能閱讀完成。
自動寫代碼機器人,免費開通
這期內容當中丸趣 TV 小編將會給大家帶來有關 Redis 中 scan 命令的作用是什么,文章內容豐富且以專業的角度為大家分析和敘述,閱讀完這篇文章希望大家可以有所收獲。
SCAN 命令
SCAN 命令的有 SCAN,SSCAN,HSCAN,ZSCAN。
SCAN 的話就是遍歷所有的 keys
其他的 SCAN 命令的話是 SCAN 選中的集合。
SCAN 命令是增量的循環,每次調用只會返回一小部分的元素。所以不會有 KEYS 命令的坑。
SCAN 命令返回的是一個游標,從 0 開始遍歷,到 0 結束遍歷。
今天我們主要從底層的結構和源碼的角度來討論 scan 是如何工作的。
Redis 的結構
Redis 使用了 Hash 表作為底層實現,原因不外乎高效且實現簡單。說到 Hash 表,很多 Java 程序員第一反應就是 HashMap。沒錯,Redis 底層 key 的存儲結構就是類似于 HashMap 那樣數組 + 鏈表的結構。其中第一維的數組大小為 2n(n =0)。每次擴容數組長度擴大一倍。
scan 命令就是對這個一維數組進行遍歷。每次返回的游標值也都是這個數組的索引。limit 參數表示遍歷多少個數組的元素,將這些元素下掛接的符合條件的結果都返回。因為每個元素下掛接的鏈表大小不同,所以每次返回的結果數量也就不同。
SCAN 的遍歷順序
關于 scan 命令的遍歷順序,我們可以用一個小栗子來具體看一下。
127.0.0.1:6379  keys *
1)  db_number
2)  key1
3)  myKey
127.0.0.1:6379  scan 0 MATCH * COUNT 1
1)  2
2) 1)  db_number
127.0.0.1:6379  scan 2 MATCH * COUNT 1
1)  1
2) 1)  myKey
127.0.0.1:6379  scan 1 MATCH * COUNT 1
1)  3
2) 1)  key1
127.0.0.1:6379  scan 3 MATCH * COUNT 1
1)  0
2) (empty list or set)
我們的 Redis 中有 3 個 key,我們每次只遍歷一個一維數組中的元素。如上所示,SCAN 命令的遍歷順序是
0- 2- 1- 3
這個順序看起來有些奇怪。我們把它轉換成二進制就好理解一些了。
00- 10- 01- 11
我們發現每次這個序列是高位加 1 的。普通二進制的加法,是從右往左相加、進位。而這個序列是從左往右相加、進位的。這一點我們在 redis 的源碼中也得到印證。
在 dict.c 文件的 dictScan 函數中對游標進行了如下處理
v = rev(v);
v = rev(v);
意思是,將游標倒置,加一后,再倒置,也就是我們所說的“高位加 1”的操作。
這里大家可能會有疑問了,為什么要使用這樣的順序進行遍歷,而不是用正常的 0、1、2……這樣的順序呢,這是因為需要考慮遍歷時發生字典擴容與縮容的情況(不得不佩服開發者考慮問題的全面性)。
我們來看一下在 SCAN 遍歷過程中,發生擴容時,遍歷會如何進行。加入我們原始的數組有 4 個元素,也就是索引有兩位,這時需要把它擴充成 3 位,并進行 rehash。
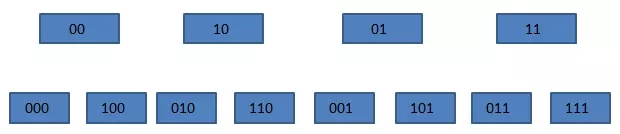
原來掛接在 xx 下的所有元素被分配到 0xx 和 1xx 下。在上圖中,當我們即將遍歷 10 時,dict 進行了 rehash,這時,scan 命令會從 010 開始遍歷,而 000 和 100(原 00 下掛接的元素)不會再被重復遍歷。
再來看看縮容的情況。假設 dict 從 3 位縮容到 2 位,當即將遍歷 110 時,dict 發生了縮容,這時 scan 會遍歷 10。這時 010 下掛接的元素會被重復遍歷,但 010 之前的元素都不會被重復遍歷了。所以,縮容時還是可能會有些重復元素出現的。
Redis 的 rehash
rehash 是一個比較復雜的過程,為了不阻塞 Redis 的進程,它采用了一種漸進式的 rehash 的機制。
/*  字典  */
typedef struct dict {
 //  類型特定函數
 dictType *type;
 //  私有數據
 void *privdata;
 //  哈希表
 dictht ht[2];
 // rehash  索引
 //  當  rehash  不在進行時,值為  -1
 int rehashidx; /* rehashing not in progress if rehashidx == -1 */
 //  目前正在運行的安全迭代器的數量
 int iterators; /* number of iterators currently running */
} dict;
在 Redis 的字典結構中,有兩個 hash 表,一個新表,一個舊表。在 rehash 的過程中,redis 將舊表中的元素逐步遷移到新表中,接下來我們看一下 dict 的 rehash 操作的源碼。
/* Performs N steps of incremental rehashing. Returns 1 if there are still
 * keys to move from the old to the new hash table, otherwise 0 is returned.
 *
 * Note that a rehashing step consists in moving a bucket (that may have more
 * than one key as we use chaining) from the old to the new hash table, however
 * since part of the hash table may be composed of empty spaces, it is not
 * guaranteed that this function will rehash even a single bucket, since it
 * will visit at max N*10 empty buckets in total, otherwise the amount of
 * work it does would be unbound and the function may block for a long time. */
int dictRehash(dict *d, int n) {
 int empty_visits = n*10; /* Max number of empty buckets to visit. */
 if (!dictIsRehashing(d)) return 0;
 while(n--   d- ht[0].used != 0) {
 dictEntry *de, *nextde;
 /* Note that rehashidx can t overflow as we are sure there are more
 * elements because ht[0].used != 0 */
 assert(d- ht[0].size   (unsigned long)d- rehashidx);
 while(d- ht[0].table[d- rehashidx] == NULL) {
 d- rehashidx++;
 if (--empty_visits == 0) return 1;
 }
 de = d- ht[0].table[d- rehashidx];
 /* Move all the keys in this bucket from the old to the new hash HT */
 while(de) {
 uint64_t h;
 nextde = de- next;
 /* Get the index in the new hash table */
 h = dictHashKey(d, de- key)   d- ht[1].sizemask;
 de- next = d- ht[1].table[h];
 d- ht[1].table[h] = de;
 d- ht[0].used--;
 d- ht[1].used++;
 de = nextde;
 }
 d- ht[0].table[d- rehashidx] = NULL;
 d- rehashidx++;
 }
 /* Check if we already rehashed the whole table... */
 if (d- ht[0].used == 0) { zfree(d- ht[0].table);
 d- ht[0] = d- ht[1];
 _dictReset(d- ht[1]);
 d- rehashidx = -1;
 return 0;
 }
 /* More to rehash... */
 return 1;
}
通過注釋我們就能了解到,rehash 的過程是以 bucket 為基本單位進行遷移的。所謂的 bucket 其實就是我們前面所提到的一維數組的元素。每次遷移一個列表。下面來解釋一下這段代碼。
首先判斷一下是否在進行 rehash,如果是,則繼續進行;否則直接返回。
接著就是分 n 步開始進行漸進式 rehash。同時還判斷是否還有剩余元素,以保證安全性。
在進行 rehash 之前,首先判斷要遷移的 bucket 是否越界。
然后跳過空的 bucket,這里有一個 empty_visits 變量,表示最大可訪問的空 bucket 的數量,這一變量主要是為了保證不過多的阻塞 Redis。
接下來就是元素的遷移,將當前 bucket 的全部元素進行 rehash,并且更新兩張表中元素的數量。
每次遷移完一個 bucket,需要將舊表中的 bucket 指向 NULL。
最后判斷一下是否全部遷移完成,如果是,則收回空間,重置 rehash 索引,否則告訴調用方,仍有數據未遷移。
由于 Redis 使用的是漸進式 rehash 機制,因此,scan 命令在需要同時掃描新表和舊表,將結果返回客戶端。
上述就是丸趣 TV 小編為大家分享的 Redis 中 scan 命令的作用是什么了,如果剛好有類似的疑惑,不妨參照上述分析進行理解。如果想知道更多相關知識,歡迎關注丸趣 TV 行業資訊頻道。
向 AI 問一下細節


