共計 3410 個字符,預計需要花費 9 分鐘才能閱讀完成。
這篇文章將為大家詳細講解有關(guān) win7+VS2010 如何安裝 CUDA7.0,丸趣 TV 小編覺得挺實用的,因此分享給大家做個參考,希望大家閱讀完這篇文章后可以有所收獲。
win7+ VS2010 安裝 CUDA7.0 圖文說明
1. 查看本機配置,查看顯卡類型是否支持 NVIDIA GPU,選中計算機 – 右鍵屬性 — 設備管理器 — 顯示適配器:NVIDIA GeForce GT 610,從 https://developer.nvidia.com/cuda-gpus 可以查到相應顯卡的 compute capability;
2. 從 http://www.nvidia.cn/Download/index.aspx?lang=cn 下載合適驅(qū)動 347.88-desktop-win8-win7-winvista-64bit-international-whql.exe 并安裝;
3. 從 https://developer.nvidia.com/cuda-toolkit 根據(jù)本機類型下載相應的最新版本 CUDA7.0 安裝;
4. 按照 http://docs.nvidia.com/cuda/cuda-getting-started-guide-for-microsoft-windows/index.html#axzz3W8BU10Ol 步驟,驗證是否安裝正確:
(1)、打開 C:\ProgramData\NVIDIACorporation\CUDA Samples\v7.0 目錄下的 Samples_vs2010.sln 工程,分別在 Debug、Release x64 下編譯整個工程;
(2)、編譯過程中,會提示找不到”d3dx9.h”、”d3dx10.h”、”d3dx11.h”頭文件,可以從 http://www.microsoft.com/en-us/download/details.aspx?id=6812 下載 DXSDK_Jun10.exe,然后安裝到默認目錄下;再編譯工程即可;
如果安裝 DXSDK_Jun10.exe 出錯,如下圖

解決辦法:
打開“控制面板”的“程序和功能”,果然計算機里之前有安裝“Microsoft Visual C++ 2010 x86 Redistributable – 1010.0.40219”,而 DXSDK_Jun 安裝的是“Microsoft Visual C++ 2010 x86 Redistributable – 1010.0.30319”,版本低于本機已安裝的版本,所以安裝出現(xiàn) s1023 錯誤。
卸載更高的版本“Microsoft Visual C++ 2010 x86 Redistributable – 1010.0.40219”和“Microsoft Visual C++ 2010 x64 Redistributable – 1010.0.40219”,再重新安裝即可。
重新啟動 vs2010,即可編譯通過。
(3)、打開 C:\Program Files\NVIDIA Corporation\Installer2\CUDASamples_7.0.{658B19AF-1B62-4FD6-A2B7-9E653E4F2B7A}\bin\win64\Release 目錄,打開 cmd 命令行,將 deviceQuery.exe 直接拖到 cmd 中,回車,會顯示 GPU 顯卡、CUDA 版本等相關(guān)信息,最后一行顯示:Result = PASS;
(4)、將 bandwidthTest.exe 拖到 cmd 中,回車,會顯示 Device0: GeForce GT 610 等相關(guān)信息,后面也會有一行顯示:Result = PASS;
5. 配置 VS2010
(1)、打開 VS2010,新建工程,選 win32,記得勾選”空項目“。
(2)、右鍵源文件 - 添加新建項 - 選擇 CUDA C/C++File,名字任意了。
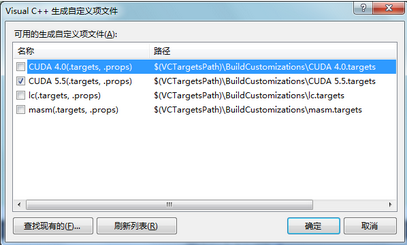
(3)、右鍵工程 - 生成自定義 - 勾選 CUDA 5.5

(4)、右鍵 main.cu- 屬性 - 項類型 選擇 CUDA C/C++

(5)、右鍵工程 - 屬性 - 鏈接器 - 常規(guī) - 附加庫目錄 - 添加目錄 $(CUDA_PATH_V7_0)\lib\$(Platform);
(6)、鏈接器 - 輸入 - 附加依賴項 添加 cudart.lib
(7)、在 main.cu 中加入代碼,示例代碼如下:
#include stdio.h
#include cuda_runtime.h
#include device_launch_parameters.h
bool InitCUDA()
{
int count;
cudaGetDeviceCount(count);
if(count == 0)
{
fprintf(stderr, There is no device.\n
return false;
}
int i;
for(i = 0; i count; i++)
{
cudaDeviceProp prop;
if(cudaGetDeviceProperties( prop, i) == cudaSuccess)
{
if(prop.major = 1)
{
break;
}
}
}
if(i == count)
{
fprintf(stderr, There is no device supporting CUDA 1.x.\n
return false;
}
cudaSetDevice(i);
return true;
}
int main()
{
if(!InitCUDA())
{
return 0;
}
printf(HelloWorld, CUDA has been initialized.\n
return 0;
}
windows7 64 位 顯卡 GT640M cuda7.5
下載了最新版本的 cuda
http://developer.download.nvidia.com/compute/cuda/7.5/Prod/local_installers/cuda_7.5.18_windows.exe
安裝 python2.7.11 64bit
https://www.python.org/downloads/windows/
首先測試是否支持 CUDA7.5
http://blog.sina.com.cn/s/blog_534497fd0102vbu3.html
打開 C:\ProgramData\NVIDIA Corporation\CUDA Samples\v7.5mu 中.sln 文件,在 vs2012 中打開,調(diào)試。
建立 win32 空工程,添加鏈接附件庫目錄 $(CUDA_PATH_V7_5)\lib\$(Platform),添加鏈接 輸入 附加依賴項 cudart.lib
添加 cuda 代碼 并在代碼屬性中設置項類型 CUDA C/C++
運行代碼
#include  stdio.h
 #include  cuda_runtime.h
 #include  device_launch_parameters.h
bool InitCUDA()
 int count;
 cudaGetDeviceCount(count);
 if(count == 0)
 {
 fprintf(stderr,  There is no device.\n
 return false;
 }
 int i;
 for(i = 0; i   count; i++)
 {
 cudaDeviceProp prop;
 if(cudaGetDeviceProperties( prop, i) == cudaSuccess)
 { if(prop.major  = 1)
 {
 break;
 }
 }
 }
 if(i == count)
 {
 fprintf(stderr,  There is no device supporting CUDA 1.x.\n
 return false;
 }
 cudaSetDevice(i);
 return true;
int main()
 if(!InitCUDA())
 {
 return 0;
 }
 printf( HelloWorld, CUDA has been initialized.\n
 return 0;
}
關(guān)于“win7+VS2010 如何安裝 CUDA7.0”這篇文章就分享到這里了,希望以上內(nèi)容可以對大家有一定的幫助,使各位可以學到更多知識,如果覺得文章不錯,請把它分享出去讓更多的人看到。

